
Tuesday 15 May 2018
Monday 14 May 2018
Major Project - Compilation of Rotorscoping.
Here are all the hand drawn scenes of rotor-scoping in my film.
There is a scene missing in the middle where the boy puts on his goggles then takes them off after he gives up which I will finish adapting after the hand in.
Saturday 12 May 2018
Major Project - 3D Print Attempt 1.
I wanted a 3D print of my model for potential display at events and for my own personal display, I thought there might be some form of cathartic release from seeing my model physically in the scale of an actual airfix, so a couple of weeks ago I sent a variation of my model to 3Dhubs to get printed.
Even though I am really happy with how convincing and accurate the overall model looks, there have unfortunately been some flaws in the printing that means i'm not happy with displaying this print of the model, and will make some changes to the design for a another attempt after this weekend.


Even though I am really happy with how convincing and accurate the overall model looks, there have unfortunately been some flaws in the printing that means i'm not happy with displaying this print of the model, and will make some changes to the design for a another attempt after this weekend.


Interior cockpit details printed nicely but windshield was inconsistent.


Random hole on the right side, will make the walls thicker on the back.

One of the props failed to print.

I tried printing it in its "Grounded" state with the gear down but apparently the landing gear was too fragile, will try to amend this by either adding some support or folding the gear in and printing a stand for it.

Comparison to an actual Airfix spitfire.
Thursday 3 May 2018
Major Project - Final Playblast of Dynamic Chase Scene.
me>
I had a strong idea of what I wanted the final outcome of the scene but knew it would require alot of tweaking to get there, first I made a rough version of my animation as can be seen Here, a big part of this scene for me was to make it look convincing, I didn't want the plane to be doing any maneuvers that were too impossible, to get a better three dimensional idea of how I was picturing it in my head I got out a model plane and puppeted the movements over and over in front of me so I could translate it easier.
I was happy with how this first run looked as a rough idea but something seemed quite off, I realized the plane wouldn't keep a consistent speed while pitching through the corners, so I slowed it down at the peak of rotation as it goes into the turn, to give it a look of it almost hanging. This may not be completely accurate to the speed consistency of the actual maneuver but I thought that by exaggerating the hang it would help sell the movements better to the audience. The keen eye can also spot that all the movements of the flaps are precisely matched to the planes pitching, rolling and yawing.
I also exteneded the final follow shot and gave the plane a fly out scene exit, I did this essentially to serve as a final glory shot of the plane before the end.
Finally I added the camera, I didn't want things to be too crazy but I added some slight shifts of angles, for example I matched the roll into first big left hand turn to make it feel almost like you're riding with it, and then the rest of the shot it meant to feel almost like you're on another plane that had gone around the otherside of the tower.
Overall I am very very happy with how this scene came out and look forward to the final render.
As my final flight scenes don't require the addition of my rotor scoping for it to look complete I have taken a playblast of what I considered to be the most challenging scene to pull off that serves as part of the finale. In my head I wanted a dynamic swooping chase shot of my spitfire flying past the Lego tower scene earlier in the film, can see my interpretation of this shot idea at 4:20 seconds in my Animatic. As you can see it was a very basic idea but in my head I had a very clear idea of what I wanted the scene to look like.
I had a strong idea of what I wanted the final outcome of the scene but knew it would require alot of tweaking to get there, first I made a rough version of my animation as can be seen Here, a big part of this scene for me was to make it look convincing, I didn't want the plane to be doing any maneuvers that were too impossible, to get a better three dimensional idea of how I was picturing it in my head I got out a model plane and puppeted the movements over and over in front of me so I could translate it easier.
I was happy with how this first run looked as a rough idea but something seemed quite off, I realized the plane wouldn't keep a consistent speed while pitching through the corners, so I slowed it down at the peak of rotation as it goes into the turn, to give it a look of it almost hanging. This may not be completely accurate to the speed consistency of the actual maneuver but I thought that by exaggerating the hang it would help sell the movements better to the audience. The keen eye can also spot that all the movements of the flaps are precisely matched to the planes pitching, rolling and yawing.
I also exteneded the final follow shot and gave the plane a fly out scene exit, I did this essentially to serve as a final glory shot of the plane before the end.
Finally I added the camera, I didn't want things to be too crazy but I added some slight shifts of angles, for example I matched the roll into first big left hand turn to make it feel almost like you're riding with it, and then the rest of the shot it meant to feel almost like you're on another plane that had gone around the otherside of the tower.
Overall I am very very happy with how this scene came out and look forward to the final render.
Tuesday 1 May 2018
Major Project - Final Lighting and Sky.
For my portrayal of the "Dreamscape" environment my desire was to create an environment that was to feel surreal in its scale, by that I meant almost the idea of standing in a void that never ends. But I also wanted a blue sky and a sense of being grounded, so I have set up this skydome so that it appears you're almost standing on a cloud line (think when you're flying on a plane and look down on the cloud line below you and how it almost looks like a snowy ground)
I also added a ShadowMatte plane for my floor level as to achieve the shadows on a surface that cleanly transitions between sky and ground, blurring the perception of when one ends and the other begins.
I've included some test renders to give an idea.


Different Source Light Angle.

Friday 27 April 2018
Major Project - Final Rigged Spitfire.

Here is my completely rigged spitfire, I spent a lot of time getting every control to have no bugs or inconveniences so that I could save myself less of a headache while animating it, so I am very very happy with how the functionality of this model and its ease of use. I also added expressions to the Propeller and Landing Gear Wheels to turn when the Root Control is moved forward.


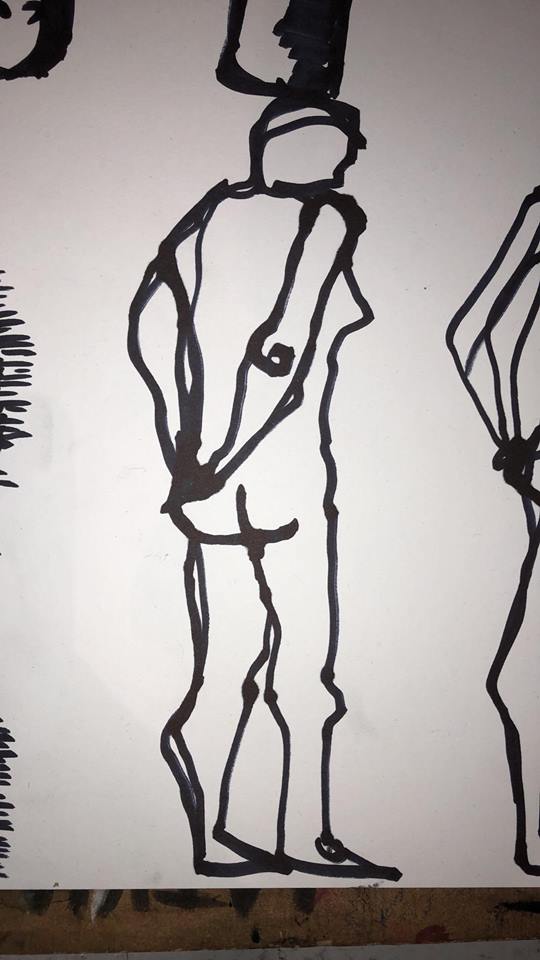
Sunday 11 March 2018
Major Project - Life Drawing for Animation Style Inspiration
I dropped into a life drawing class to try different methods of drawing quick poses, conveying movement in a frame and testing more experimental styles like not taking the pen off the paper drawing with only with horizontal lines.


Wednesday 7 March 2018
Major Project - Spitfire Complete Disassembled Model.
I have broken apart my Spitfire so that it very closely resembles how the actual real life model looks pre-assembly. I spent time shelling each of the meshes so that they can be included properly and integrated with each other into a Sprue as seen below.


Tuesday 6 March 2018
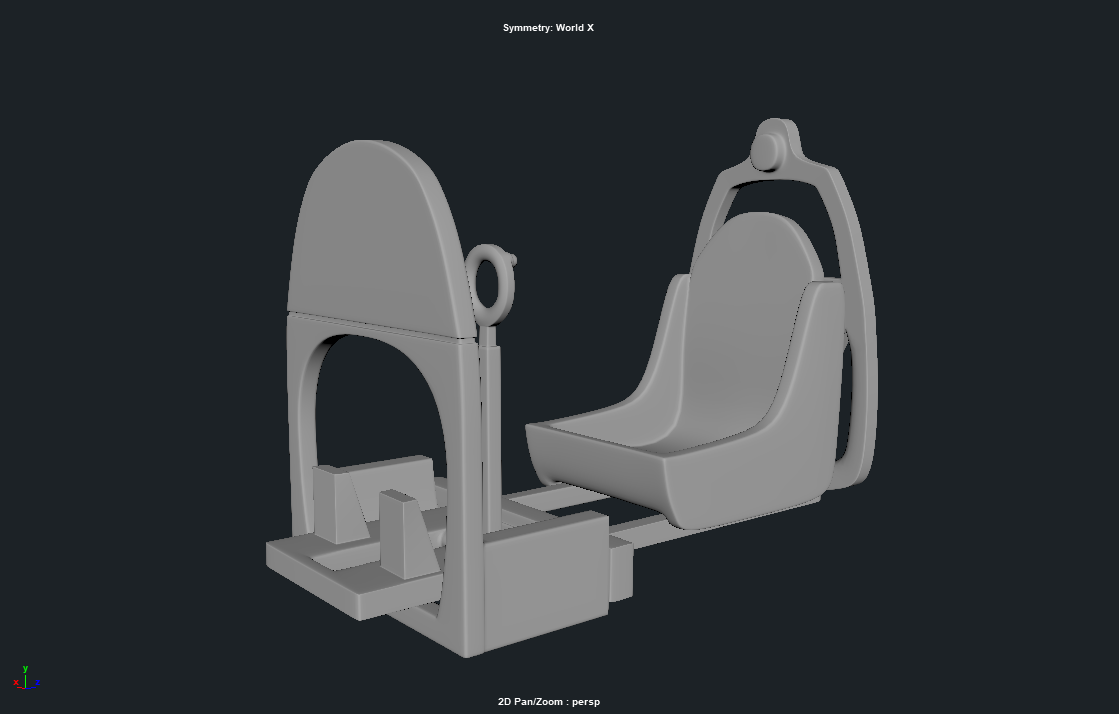
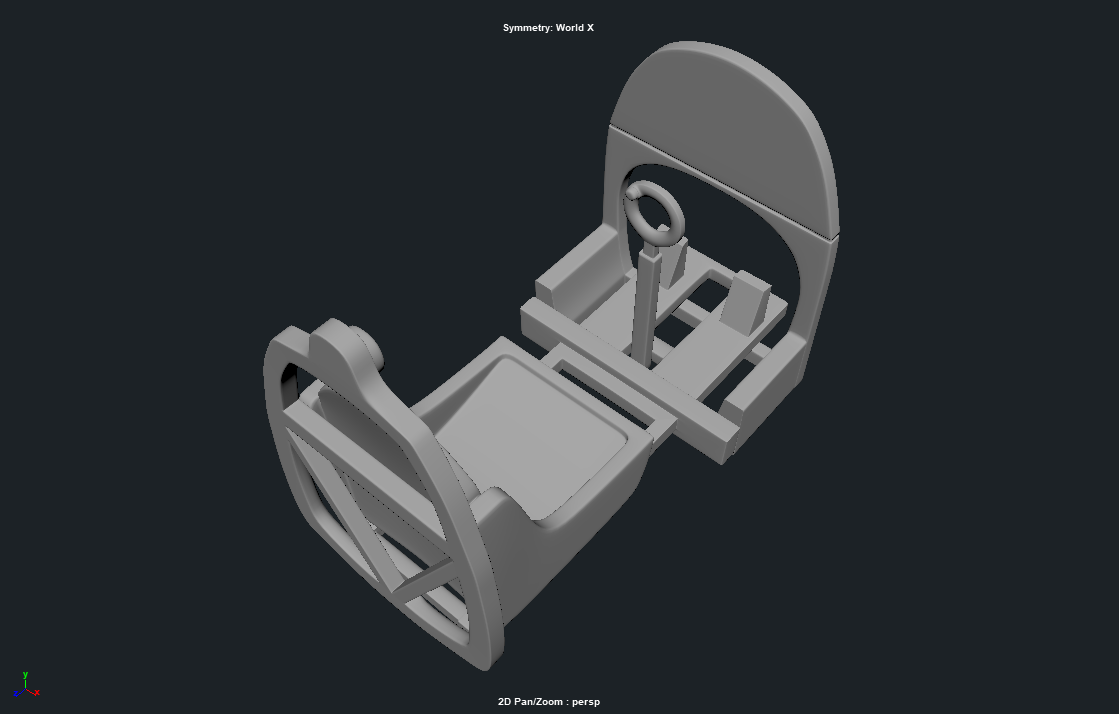
Major Project - Spitfire Cockpit Interior.
While taking apart my spitfire for the assembly scenes and the for the modelling of the sprues (the plastic the parts come attached to) I decided that I needed the interior of my cockpit to be faithful to a level I was happy with to the real life equivalent.
I took some liverties with some of the final details as I don't have many shots where you can see inside the cockpit but as you can see I managed to capture the overall look and scale rather faithfully, and as you can see if fits inside the Spitfire faithfully to my real world airfix model.


Tuesday 16 January 2018
Major Project - Potential Implementation of a Normal Map to the Spitfire.
After I had rendered my Spitfire and got a look at the near final product I was very happy with how it looked, but I decided that I could potentially make it look even better by adding another level of detail that could really take it up a notch by adding a layer of normal maps for the panel lines of the Spitfire.
After a recommendation from fellow student Ian Garling we decided that the best way to achieve this simple effect would be to use the Photoshop plug-in NormalX.

As you can see here I have a version of the wing that includes the panel line details from my real world air fix model, I think the method I used to get the normal maps really suited the simplicity of the required lines and rivets, although I have found some issues after implementing the maps.

As you can see in this picture I have highlighted areas where the seams of the UV map have become visible due to the implementation of the map, this may be easily fixed or it might just be the way I mapped the model.
At this point I am able to produce normal maps for the model at a fairly rapid rate thanks to Photoshop so I will have to experiment with it.
But what do you all think? Do you prefer the design with the addition of more detail, or the cleaner un-paneled design from before? (See below)


Subscribe to:
Posts (Atom)
-
 Here are my final concept designs for the centre piece building of my final piece, please chose which ever one (or more than one) you like t...
 -
Edward Scissorhands (1990) Fig.1 In 1990 a picture that can only be described as a love letter to the classic campy horror/th...

